The View Menu
- Fit
In the outline and bitmap views this will scale the current glyph to the largest setting where it all fits in the view.
- Zoom Out
Not in the font view. Centered on the middle selection if there is one, else the middle of the view.
- Zoom In
Not in the font view. Centered on the middle selection if there is one, else the middle of the view.
- Next Glyph
In the metrics, outline and bitmap view this changes the current glyph to be the next one in the font.
In the font view this selects the next glyph in the font (and scrolls, if necessary, to display that glyph).
- Prev Glyph
In the metrics, outline and bitmap view this changes the current glyph to be the previous one in the font.
In the font view this selects the next glyph in the font (and scrolls, if necessary, to display that glyph).
- Next Defined Glyph
Similar to Next Glyph, except it moves to the next glyph defined in the font.
- Prev Defined Glyph
Similar to Prev Glyph, except it moves to the previous glyph defined in the font.
- Former Glyph
Changes the glyph window to look at whatever glyph was being edited there before this one (one level of history).
- Substitutions
Brings up a sub menu showing all the GSUB type 1 and type 3 substitutions (simple and alternate) you have defined for the selected glyph and allows you to change the glyph as directed by the substitution. Also contains an entry to return you to the original glyph.
Substitutions may be set with the Element->Glyph Info command.
- Goto
- Replace Glyph...
In the Font, Outline, Bitmap and Metrics views this brings up a dialog in which you may type either:
A name of a glyph in the current font
A number (in either decimal or hex) indicating the glyph you are interested in, in the current encoding
A hex number ,preceded by “U+” or “uni” or “u”, indicating the character you are interested in in unicode.
A decimal number, preceded by “glyph” ,indicating the glyph index in the original glyph list.
A ku ten representation of a CJK font (two comma separated numbers)
A standard name (which need not be used in the current font) but which can be mapped to a unicode value.
For 2/4 byte encodings you will also be shown a pull-down list of unicode ranges (Things like “Greek”, “Katakana”, “Hangul Compatibility Jamo”) and you can select one of the range names.
Arabic letters may also be named as:
afii57442.isolatedor0x642.initialA single unicode character
In the font view the view will scroll so that this glyph is visible and it will be selected
In the bitmap, outline and metrics views, the current glyph will change to be the one specified.
- Insert Glyph Before...
- Insert Glyph After...
In the metrics view this brings up a dialog similar to the previous one allowing you to enter a glyph by name or encoding either before or after the currently selected position.
- Layers
A submenu which only appears in the font view. It lets you chose which layer to display in the font view.
- Find In Font View
In the outline, bitmap and metrics views this will scroll the associated font view so that the current glyph is displayed (and selected) in the fontview.
- Show ATT
Only in the font view. Brings up a dlg showing the advanced typographic tables (GPOS/GSUB or morx/kern) that FontForge supports.
- Display Substitutions
Only in the font view. This allows you to select a simple substitution, any glyph with that substitution attached will be displayed as the substituted glyph. Any glyph without such a substitution will be left blank. Double clicking on a glyph will either go the substituted version or will create a substituted version and go to that. (However almost no other commands will be aware of this mapping, which will probably be confusing).
Displaying small caps (‘smcp’ substitution)
- Combinations
A submenu containing
- Kern Pairs
This brings up a dialog showing all kerning pairs in the current font (or, if invoked from the outline glyph view, a list of all kerning pairs involving that glyph). You may alter kerning pairs here too.
- Anchored Pairs
This may have a sub-menu of its own containing all the anchor classes for this font and an entry “All”. You may choose to see all combinations of glyphs from a given anchor class, or all combinations from all anchored classes.
If invoked from the outline glyph view it will provide a list of all anchored combinations involving that glyph.
Selecting a combination and double clicking on it will bring up an Anchor Control dialog.
- Anchor Control
Only in the outline view. Has a submenu of all anchor points in this glyph. Selecting one brings upt the Anchor Control dialog.
- Anchor Glyph at Point
Only in the outline view. Allows you to attach and display another glyph at the selected anchor point.
- Ligatures
This brings up a dialog showing the names of all ligatures and of the glyphs that compose them (if invoked from the outline glyph view, a list of all ligatures containing that glyph). Double clicking on an entry will bring up a window showing that ligature.
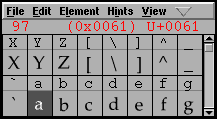
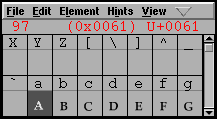
- Label Glyph By
In the font view each glyph has a label above it. This may be either:
An image of the glyph (from a conventional font)
The name of the glyph
The unicode code point associated with the glyph
The glyph’s encoding (in hex)
Note that when the glyphs are small (the 24 pixel view, for example) there may not be room for the entire name of each glyph (or even for the encoding), so the labels may be truncated.
- View H. Metrics...
In the font view this will control which of the horizontal metrics lines are draw across the displayed glyphs. In the outline glyph view the same functionality is available from one of the palettes. See the font view for more information
- View V. Metrics...
In the font view this will control which of the vertical metrics lines are draw across the displayed glyphs. In the outline glyph view the same functionality is available from one of the palettes. (This will be greyed out if your font does not have vertical metrics in it). See the font view for more information
- 32x8 cell window
In the font view you may explicitly set the window size so that there are 32 glyph cells horizontally and 8 vertically.
- 16x4 cell window
In the font view you may explicitly set the window size so that there are 16 glyph cells horizontally and 4 vertically.
- 8x2 cell window
In the font view you may explicitly set the window size so that there are 8 glyph cells horizontally and 2 vertically.
- 24 pixel outline
In the font view you may choose how large you want the rasterized representation of the outline view to be. The default is to rasterize it on a 24 pixel block. If this item is checked then a 24 pixel version of the outline font is displayed, selecting it will display a 24 pixel version of the font.
(Exactly one em-square of the glyph will be displayed, if the glyph extends above the ascent or below the descent those features will be clipped)
- 36 pixel outline
Similar to the above but for a 36 pixel version.
- 48 pixel outline
Similar to the above but for a 48 pixel version.
- 72 pixel outline
Similar to the above but for a 72 pixel version.
- 96 pixel outline
Similar to the above but for a 96 pixel version.
- AntiAlias
Only in the font and metrics view. Toggles between whether the font displayed in the view is a bitmapped font or an anti-aliased font. An Anti-aliased font shows levels of grey rather than just black and white. It often looks better than a bitmap, but it is slower to generate and draw.
- Vertical
Only in the metrics view. Toggles between displaying horizontal and vertical metrics. (Only available if Element ‣ Font Info ‣ General ‣ Has Vertical Metrics is set).
- Fit To Em
Only in the font view. The fontview will either display glyphs scaled so that the font’s bounding box fits in the window, or so that the em fits in the window. The advantage of the first method is that you see all of each glyph, the advantage of the second is that you can see how the letter sizes compare from font to font.
(This is something of a simplification. In bounding box mode the displayed font is scaled so that the vertical size (as found in the bounding box) fits it the window. Very wide glyphs will still not fit horizontally. Also the scaling is not updated when glyphs change, if you have changed the maximum bounds of the font you might want to force a rescale by toggling this mode)
- Bitmap Magnification...
In the font view. When displaying a bitmap font it is sometimes desirable to look at the font with a greater magnification than normal.
- <list of bitmap pixel sizes, if any>
In the font view or metrics view there is a list of all generated bitmap fonts. You may select to have one of them displayed in the view rather than a rasterized version of the outline font. If one is checked then that one is currently displayed, if you select one then it will be displayed.
In CID keyed fonts this list will not be present.
If your font database includes some greymap fonts then these will be listed here too, as usual they will be displayed as <pixel-size>@<bits-per-pixel>
- Show/Hide Grid
In the Metrics View this entry allows you to turn on or off the lines marking the edges of the glyphs on display. There are 4 levels
Show Grid – Always show the full grid lines
Partial Grid – Show short lines at the top and bottom of the window so the line will not be distracting when examining spacing
Hide when moving – Show the full grid line normally, but it will vanish while the user adjusts spacing with the mouse
Hode Grid – Always hide the grid.
- Outline
In the Metrics View this will be checked when the outline font is bring displayed. Selecting it will display the outline font (rather than a bitmap font).
- Number Points
In the Outline view, this small sub-menu allows you to control whether point numbers are displayed next to points in the foreground view. This is primarily for TrueType, where the instructions use these numbers to refer to the points when they do grid-fitting. The numbering scheme is a little different depending on what the expected output (input) will be, so we have a sub-menu listing output types.
- Show Grid Fit
- Show Grid Fit
In the Outline view and only if the freetype library is available. Brings up a dialog which allows you to control whether a grid fit version of the splines in the font is displayed.
- Bigger Point Size
In the Outline view, if grid fitting is turned on, this will increase the point size (note, this is slightly different from increasing the pixel size).
- Smaller Point Size
In the Outline view, if grid fitting is turned on, this will decrease the point size.
- Anti-Alias
In the Outline view, if grid fitting is turned on, this will toggle whether the display is in anti alias mode.
- Off
Turns off grid fitting.
- Show
This submenu is only in the outline glyph view.
- Points
This hides or displays the points in the outline glyph view.
- Show Control Point Info
In the Outline view, when you move a control point this mode pops up a little window showing various bits of information about the control point you are editing.
- Extrema
In the Outline view,
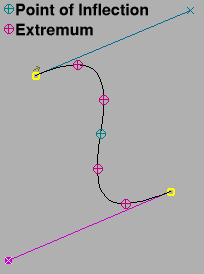
in postscript and truetype fonts (in almost all cases) should have their horizontal and vertical extrema at the endpoints of splines. This setting will mark extremal endpoints by coloring them a dull purple to remind you that you should not delete them. If an extremum occurs somewhere other than an end point a crosshair will be drawn around it. You might consider doing Element->Add Extrema in this case (or you might not, this can be ok in some cases).
- Points of Inflection
In the Outline view, points of inflection occur where the change in the slope of the curve (second derivative) changes sign. Quadratic splines (truetype) cannot represent points of inflection. If you have a postscript font which you intend to convert to truetype it can be helpful to know where these difficult points lie. (the cubic->quadratic approximation routines will often add intermediate points at these points of inflection)
- Almost Horizontal/Vertical Lines
If a line is almost, but not quite horizontal or vertical then draw the line in a different color to show visually that it should be fixed.
- Almost Horizontal/Vertical Curves
If a curve is almost, but not quite horizontal or vertical at one of its endpoints then draw little tick marks at the end point to indicate this.
- (Define Almost)
Define what “almost” means, as used in the above two commands.
- Side Bearings
Draws little lines to mark the left and right side bearings of a glyph.
- Fill
In the Outline view this fills in the glyph outline as you edit it. (this can be very slow. If the glyph is too big (too magnified) then filling will not be done).
- Preview
A preview mode hides points, hints, various other stuff and fills the outline to give a better feeel of the glyph’s looks. Besides usual shortcut toggling it on and off - Ctrl+[*key above Tab*] (eg, Ctrl+` on a US keyboard) - it can be also used by holding that [*key above Tab*] down (unless quick navigation is enabled).
- Palettes
- Tools
If this item is checked then the tools palette (in the outline and bitmap views) is visible. Selecting it toggles whether the palette is visible or not.
- Layers
If this item is checked then the layers palette (in the outline and bitmap views) is visible. Selecting it toggles whether the palette is visible or not.
- Shades
Only in the bitmap view, and only if editing grey-scale (anti-aliased) fonts. Controls whether the shades of grey palette is visible or not.
- Dock Palettes
Allows you to control whether you want the palettes free standing or docked in the current view.
The window manager under gnome does not handle this properly. If you want docked palettes under gnome: Open a window with palettes, select docked palettes (the palettes will not dock), close the window, reopen the window. The palettes are now docked and should be from here on.
- Glyph Tabs
Controls whether the outline glyph view has a set of tabs of past glyphs viewed in that window.
- Rulers
In the Glyph Outline View toggles whether rulers appear at the top and to the left of the editing area.
- Horizontal Hints
Controls whether horizontal hints are visible
- Vertical Hints
Controls whether vertical hints are visible
- Diagonal Hints
Controls whether diagonal hints are visible
- BlueValues
Controls whether the glyph’s PostScript BlueValues are visible
- FamilyBlues
Controls whether the glyph’s PostScript FamilyBlues are visible.
- Anchors
Controls whether Anchor points are visible
- Horizontal Metrics
Controls whether horizontal metrics lines (the width line) are visible.
- Vertical Metrics
Controls whether vertical metrics lines (the vertical advance line) are visible.
- Snap Outlines to Pixel Grid
Cairo can draw contours with sub-pixel resolution – which means that if a spline’s end point falls somewhere between two pixels then cairo will draw a bit of the contour on both pixels this leads to an often undesirable level of fuzziness. In some sense it provides a more accurate indication of where the spline goes. This menu item can be used to turn that on and off.
- Bigger Pixel Size
In the bitmap view this displays the current glyph in next larger bitmap font (if there is one)
- Smaller Pixel Size
In the bitmap view this displays the current glyph in next smaller bitmap font (if there is one)