The Point Menu
This menu is only available in the Outline Character View.
- Curve
If all the selected points are Curve points then this entry will be checked. Selecting it will change all selected points to be Curve points.
- Corner
If all the selected points are Corner points then this entry will be checked. Selecting it will change all selected points to be Corner points.
- Tangent
If all the selected points are Tangent points then this entry will be checked. Selecting it will change all selected points to be Tangent points.
- Make First
If exactly one point is selected and it is on a closed path and it is not the “first point” of that path, then it will become the first point.
- Can Be Interpolated
- Can't Be Interpolated
When editing truetype curves, an on-curve point can be omitted from the point list that is stored in the output font if it happens to be exactly midway between its two control points. This makes for slightly smaller files and is generally a good thing. However if the point is interpolated then it cannot be referred to in instructions (or reference point matching), so on rare occasions you will need to be able to turn off this interpolation.
- Add Anchor Point...
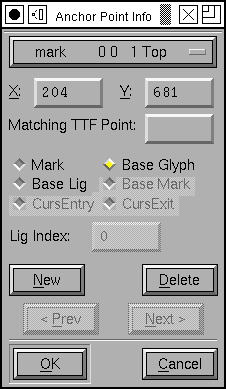
This command adds a new anchor point to the glyph. The last click in the window provides a default location for the point.
See the overview and the Element->Get Info command for more info.
- Acceptable Extrema
Tells the validator that it is OK for this spline to have extrema. You select a spline by selecting its two end-points.
- Make Line
If two adjacent points are selected then make the spline between them into a straight line. If two points are selected and they are the endpoints of their respective (open) contours, then join them with a line. If a point is selected and has no adjacent selected points then make its control points be on top of the point
- Make Arc
If two adjacent points are selected then make the spline between them into an elliptical arc. If two points are selected and they are the endpoints of their respective (open) contours, then join them with an elliptical arc.
FontForge chooses an ellipse which runs through the two points and is tangent to the slope at those points. This is not enough information to determine an ellipse (three points and two tangents are needed) so in general there will be an infinite number of solutions, thus FontForge may not pick the one you had your heart set on.
It is also possible to specify a set of input constraints which cannot be met by any ellipse.
FontForge will first search for ellipses so that one of the selected points lies one of the axes of the ellipse. If it can’t find one like that it will perform a more general search.
(If you hold down the <Alt> key when you select the menu item, then FontForge will place a copy of the full ellipse into the background layer – this was for debugging, but I thought it kind of cool so I left it in).
- Insert Point on Spline at...
Select the two end-points of a spline, then bring up this dialog. You can request that FontForge insert a point on the selected spline with either a given X or a given Y coordinate.
- Center Between Control Points
In truetype, if an on-curve point is centered between its control points, then that point may be omitted when written to the output file. This command allows you to create such a point more easily.
- Name Contour
A contour may be named. This is designed for use in the Guide line (and Background) layer. You can attach a mnemonic name to a guide line (like “X-Height” or “Cap-Height” or whatever strikes your fancy).
- Make Clip Path
Only meaningful in Type3 fonts. For a more complete description see the section on Type3 editing. The clipping path will be set to any selected contour(s) in the glyph. If no contour is selected then there will be no clipping path.