Editing Contextual or Chaining Contextual lookups
What is a Contextual Positioning lookup?
There are two types of contextual positioning modes: Contextual Positioning
and Chained Contextual Positioning. In the simplest form of the first you
may specify a list glyphs and specify repositioning to occur if that sequence
is matched. For example you might specify (in English)
5 t h
and if that sequence were found raise the "t" and "h" to 5th.
You can also specify classes of glyphs so you could say something like:
[0-9] t h
to raise "t" and "h" after any digit.
After applying this lookup, a word processor will skip over the three glyphs matched by the pattern, at least it will in a simple "Contextual Positioning" lookup. The "Chained Contextual Positioning" lookup is a bit more general and allows you to divide the pattern into three parts: A part before the current glyph (called backtracking), a part including the current glyph, and a part after the current glyph (called lookahead). Positioning changes may only be made to the part including the current glyph, and the word processor will advance by the number of glyphs in that subset of the pattern.
What is a Contextual Substitution lookup?
Substitutions come in three types. The first two are similar to the two types for positioning, the third is designed to handle a very specific case of arabic typography and is applied backwards.
Suppose you had a script font where most letters join at the base line, but
after some letters (b,o,v,w) the join is near the x-height, so a special
version of each lower case letter needs to be created designed for a left
side join near the x-height. You would want to be able to say:
[bovw] [a-z]
Note that this just specifies the cases in which the substitution may be
applied. It does not specify the substitution itself, that is done in a separate
lookup.
You may pull down an example script font with this substitution from FormalScript.tgz, this example is worked out in detail in the tutorial.
More complete descriptions
For more information on contextual lookups see Adobe's Docs:
- The GPOS table, for positioning glyphs
- The GSUB table, for substituting glyphs
- The feature tag registry.
How do these relate to Apple Advanced Typography features?
In some cases a contextual or chaining contextual substitution can be converted into one of Apple's contextual glyph substitution subtables. See the page on Apple Advanced Typography for more information as to when and caveats about how.
Creating a contextual lookup
First you must create a contextual lookup with the Element->Font Info->Lookups dialog, then in that same dialog create and name a subtable in that lookup. Then the contextual editor will open.
Editing a lookup
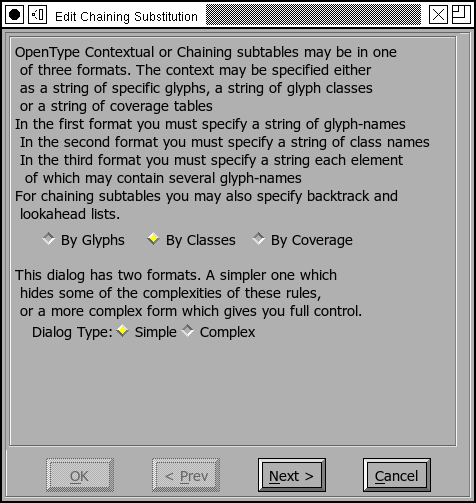
 Format
Except for the reverse chaining features, any of these may come in one of three formats.
The simplest format is a list of glyphs. You may specify
several glyph sequences in a single feature. So the script example above
could be specified (quite inefficiently) by 4*26 lines like:
b a
b b
      ...

        o a
...
The next format allows you to specify a list of
classes. In the script example we would define 2
classes:
[bovw]
[ac-np-ux-z]
and define two patterns as:
      class1 [class2]

        class1 [class1]
The third format is the most general and allows you to specify your pattern
by a separate list of glyphs for each glyph
position:
[bovw] [a-z]
Most contextual specifications are fairly simple, FontForge has two dialog formats, one for simpler specifications and one for more complicated ones. The complicated dialog is (I think) more difficult to understand, but allows for greater generality.
In both the glyph and the class format you are allowed to specify multiple
matching rules (in the coverage format you may only specify one rule. I know
this sounds odd, I did not design the system). UNFORTUNATELY
the OpenType interpreters do not seem to support multiple rules within a
single subtable. Instead I suggest you use multiple subtables. It will have
the same effect but is less efficient. FontForge still supports multiple
rules because the spec says it should.
 Simple Coverage
This display shows a list of three items, the first column consists of coverage tables -- that is lists of glyphs. A match occurs if the current glyph matches one of the glyphs named in the current coverage table. The second column contains the name of a lookup that should be applied to the glyph associated with the coverage table if the entire rule matches.
As noted earlier the rule is divided into three sections, backtrack, match and lookahead. The third column indicates when each section starts. Lookups may only occur in the middle (the "match") section. If you don't specify the start of each section FontForge will figure it out for you assuming that the match section starts with the first lookup and ends with the last. WARNING: this simple heuristic does not work for ligatures. The match section must be long enough to provide all glyphs that might be consumed by the ligature conversion.
This lookup does not directly describe how transformations are to happen to the glyphs, merely WHEN. Instead it invokes a nested lookup that will be applied to specific positions in the match string (positions in the backtrack and lookahead lists may not be transformed).
So in the example at right, the first list of glyphs is a coverage table in the backtrack section, while the second line starts the match section. The rule says that if one of the letters [bovw] is followed by any other letter, then the second letter should be transformed using the nested lookup "To-TopJoin" (which will convert the glyph into an alternate format). Here there is no need for a lookahead list (and there is none).
Setting a coverage table
You can change a coverage table by editing it. You may enter either glyph
names or unicode characters (which will be converted to a glyph name -- a
few characters which have special meaning: space, right parenthesis, asterix;
must have their names typed in full). If you click on the little box on the
right you will get a dialog containing a font view. In this view you may
select glyphs to your heart's content, when you press OK these glyphs become
your table.
 Coverage
This display shows a list whose entries are coverage tables -- that is lists of glyphs. A match occurs if the current glyph matches one of the glyphs named in the current coverage table.
In the example at right there is only a single coverage table here (but there could be more).
In a Chaining Contextual feature it is also possible to specify a list of coverage tables to match glyphs before the current glyph, and another list to match glyphs after.
In the example at right, the lookup 'high' will be applied to any glyph that matches the coverage table at the top of the list. Again the buttons under the sequence lookup list allow you to add, change, remove or reorder these transformations. (And yes, the order the transformations are applied can matter in complex situations).
Creating or editing a lookup position pair
You can change a lookup by clicking on it, this will produce a pull down menu of all lookups that can be applied. You can change the position by editing it.
You can add a new entry by pressing the <New> button, and then selecting
a lookup.
 Simple Glyphs
In the glyph format each rule allows you to specify a list of glyphs that
need to be matched along with lookups that should be applied to appropriate
glyphs after the match has been made.
Again each rule is divided into sections (here marked with the vertical bar "|"). In the match section glyphs may be followed by lookup names, and those lookups will be applied to the preceding glyph if a match occurs.
So the example at right is an attempt to do with a series of glyph rules what was done easily with one coverage table rule. Every possible combination of letters must be spelled out as a separate rule.
At the bottom of the list are two buttons, one to add a lookup reference after
a glyph, and the other to start a new section.
 Glyphs
This format allows you to specify several glyph lists to match. In the example at right the string "A,B,C" will be matched in the glyphs before the current glyph, then "D E" starting at the current location, and finally "F G H" after them. If everything matched then the lookup "Smallcaps" will be applied to location 0 (in this case "D") , and "superscript" to location 1 (here, "E").
The order is significant, word processors will stop at the first match they
find so in the following pattern strings:
b a
b a f
the second entry would never be matched because "b a" would be applied first.
While:
b a f
b a
would apply match "b a f" when an "f" was present, and "b a"
otherwise.
 Selecting
glyphs
The text field may be manipulated as above. However here we are specifying a string of glyphs each of which must be matched, rather than a class of glyphs any of which could match. So in the example at right, "DE" would match, but "E" would not.
As above a set of lookups can be applied after the match occurs.
 Simple Classes
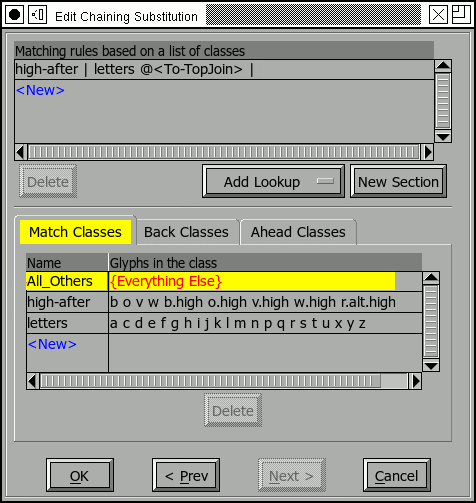
When specifying a class match, you must specify at least one set of glyph classes. If you only specify one set these classes will be used in all sections, alternately each section may have its own set of glyph classes. You may give each glyph class a name (if you don't then the class will be named something dull like "1", "2", etc.)
You must also specify a list of patterns where each pattern is a list of class names (or numbers).
Every set of classes has a magic class at index 0 which matches whatever glyphs are not explicitly mentioned in another class. FontForge displays this by calling it "{Everything Else}". You may not delete, edit nor reorder this class. Other classes are just unordered lists of glyph names (rather like coverage tables above), however any specific glyph may belong to at most one class at a time (whereas a glyph may occur in as many coverage tables as desired).
In the example at right, any letter that occurs after one of the special letters [bovw] will be changed into an alternate form.
There is a small bug here. Because classes must be disjoint, the "letters"
class does not contain the letters [bovw]. So there actually needs to be
a second rule that looks like "high-after | high-after @<To-TopJoin> |".
As I mentioned early, multiple rules don't actually work, so that rule
is in a separate subtable (which is in the same lookup) and isn't displayed
here.
 Classes
 A
list of Class numbers
Once you have set up your classes, you may then edit the patterns you want to match. To remind you of what your classes are, FontForge displays the class list underneath the pattern. Clicking on a class will insert that class's index into the pattern.
Finally you must set the nested lookups. This is exactly the same as previous
sequence / lookup settings.